Why choose Bybit? Futures Maker fees are only 0.02% (among the lowest in the industry), the trading interface is intuitive, and the copy trading feature is mature. It is one of the platforms futures traders often consider first.
Bybit is one of the world’s top three crypto exchanges by trading volume and supports more than 600 coins. This guide starts from registration and walks through KYC verification, security settings, and your first deposit.
Do not have a way to convert TWD into USDT yet? Start with the MAX exchange TWD deposit guide, then transfer USDT to Bybit.
Updated for 2026, with refreshed interface screenshots.
What is Bybit? Why futures traders recommend Bybit
Bybit was founded in 2018. It started with crypto futures trading and later expanded quickly into spot trading, copy trading, Bybit Earn, Web3 wallet features, and more.
Key numbers:
- Top-three global trading volume, with daily volume often above tens of billions of U.S. dollars
- More than 600 supported cryptocurrencies, one of the broader selections among major exchanges
- More than 50 million registered users
- Traditional Chinese interface, friendly for Taiwan users
- Licenses in jurisdictions including the United Arab Emirates, Kazakhstan, and Turkey
Many traders consider Bybit’s futures interface more intuitive than Binance’s. If futures are your main use case, Bybit is an option worth considering.
Is Bybit safe?
Bybit’s security setup includes:
- Cold wallet storage: most user assets are stored in offline cold wallets
- Proof of Reserves: regularly published, on-chain verifiable reserve proof that users can check themselves
- Multi-signature controls: withdrawals require multi-signature authorization
- Risk control systems: real-time abnormal-behavior detection and account freezing
In February 2025, Bybit suffered a major security incident involving about USD 1.46 billion worth of ETH. Within 72 hours after the incident, Bybit fully replenished user assets and no user took a loss. The incident showed that the risk is real, while also showing Bybit’s financial capacity and crisis response.
As with every exchange, do not keep all your assets in one place. Keep only the portion you need for trading on the exchange.
Bybit fee comparison: futures Maker among the lowest in the industry
Before registering, first understand what fees you may pay:
| Trading type | Maker | Taker |
|---|---|---|
| Spot trading | 0.1% | 0.1% |
| Futures trading | 0.02% | 0.055% |
Main point: Bybit’s futures Maker rate of 0.02% is among the lowest at major exchanges. If you trade futures, this fee advantage is very clear.
The higher your VIP level, the lower the fees. Bybit calculates VIP level based on 30-day trading volume and asset balance.
Bybit referral code
Registering through the referral link below can give you trading-fee benefits and new-user rewards:
Referral benefits must be used during the first registration. They cannot be added later.
Bybit registration steps (illustrated guide)
Step 1: Open the registration page
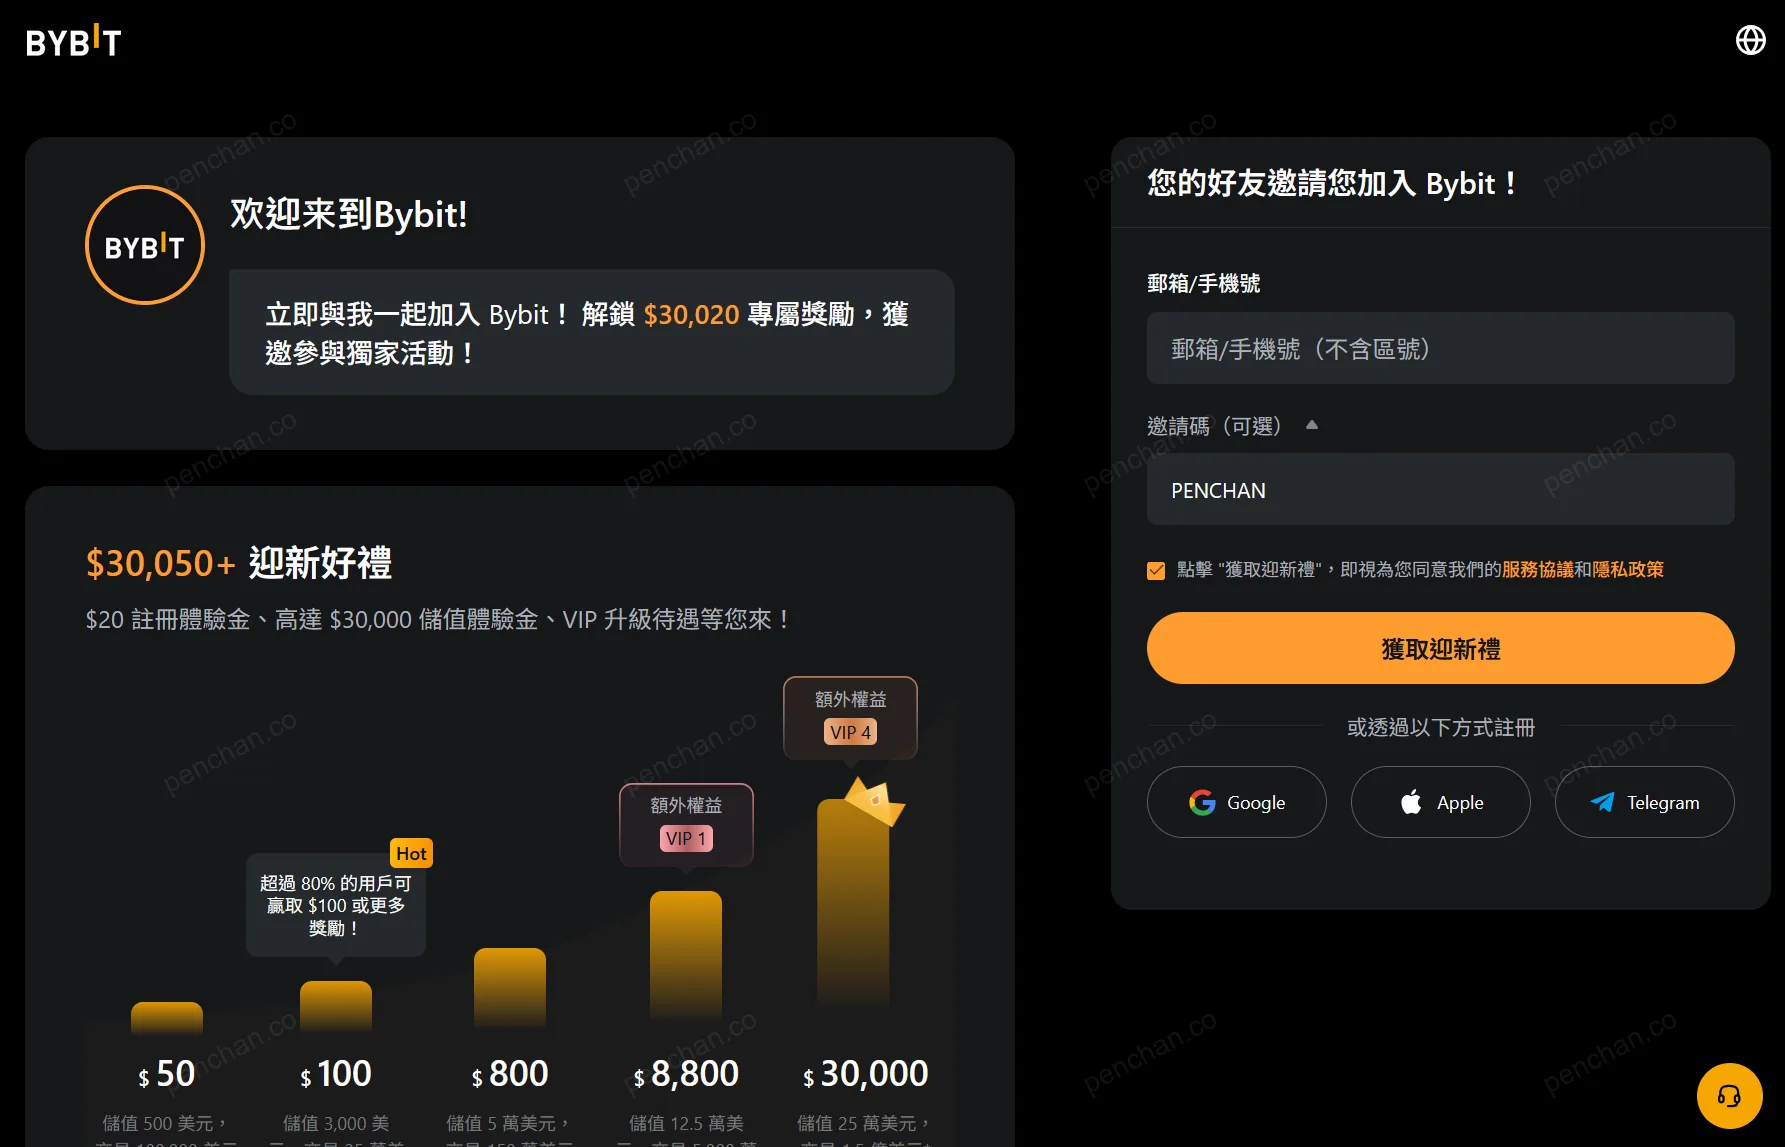
Go to the Bybit registration page. You will see the registration form. You can also type bybit.com directly in your browser.
Step 2: Choose a registration method
Bybit supports two registration methods in the form:
- Email registration: enter your email address and password
- Mobile registration: enter your phone number and password
Email registration is recommended. You can bind your phone number later as an additional layer of protection.
Step 3: Set a password
Password requirements:
- At least 8 characters
- Include uppercase and lowercase letters plus numbers
- Use a password manager to generate a strong password if possible
Step 4: Verify your email
Enter the 6-digit verification code sent to your inbox to complete email verification.
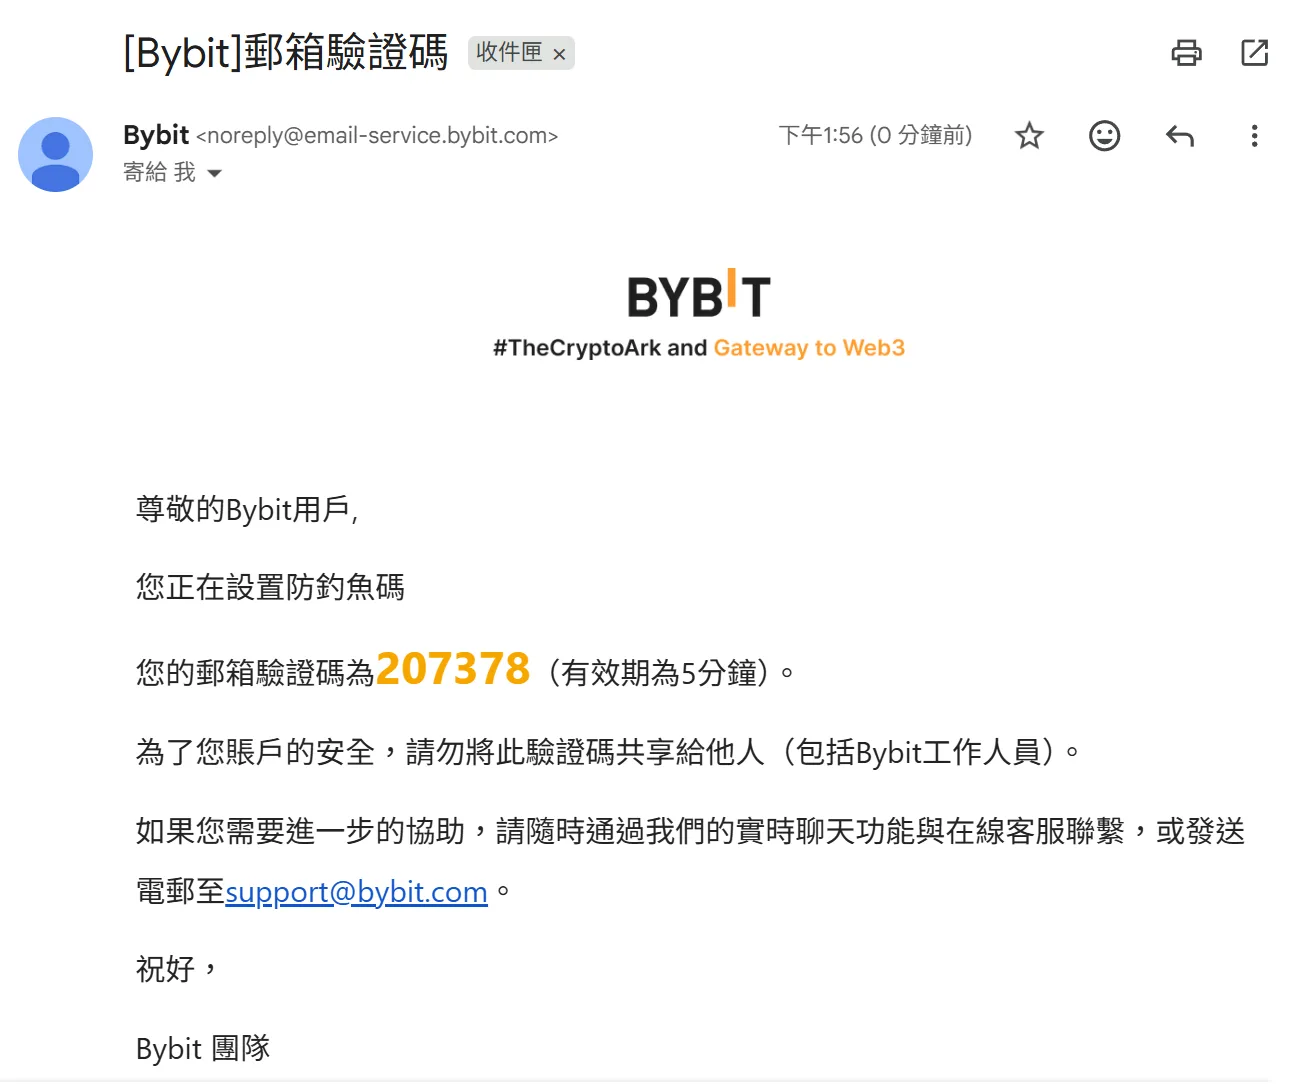
Did not receive the email? Check your spam folder first. If it still is not there, click “Resend” and wait a few minutes. Some company mailboxes may block Bybit emails, so Gmail or Outlook is usually safer.
Step 5: Registration complete
After verification, you have a Bybit account. Next, complete KYC to unlock the full feature set.
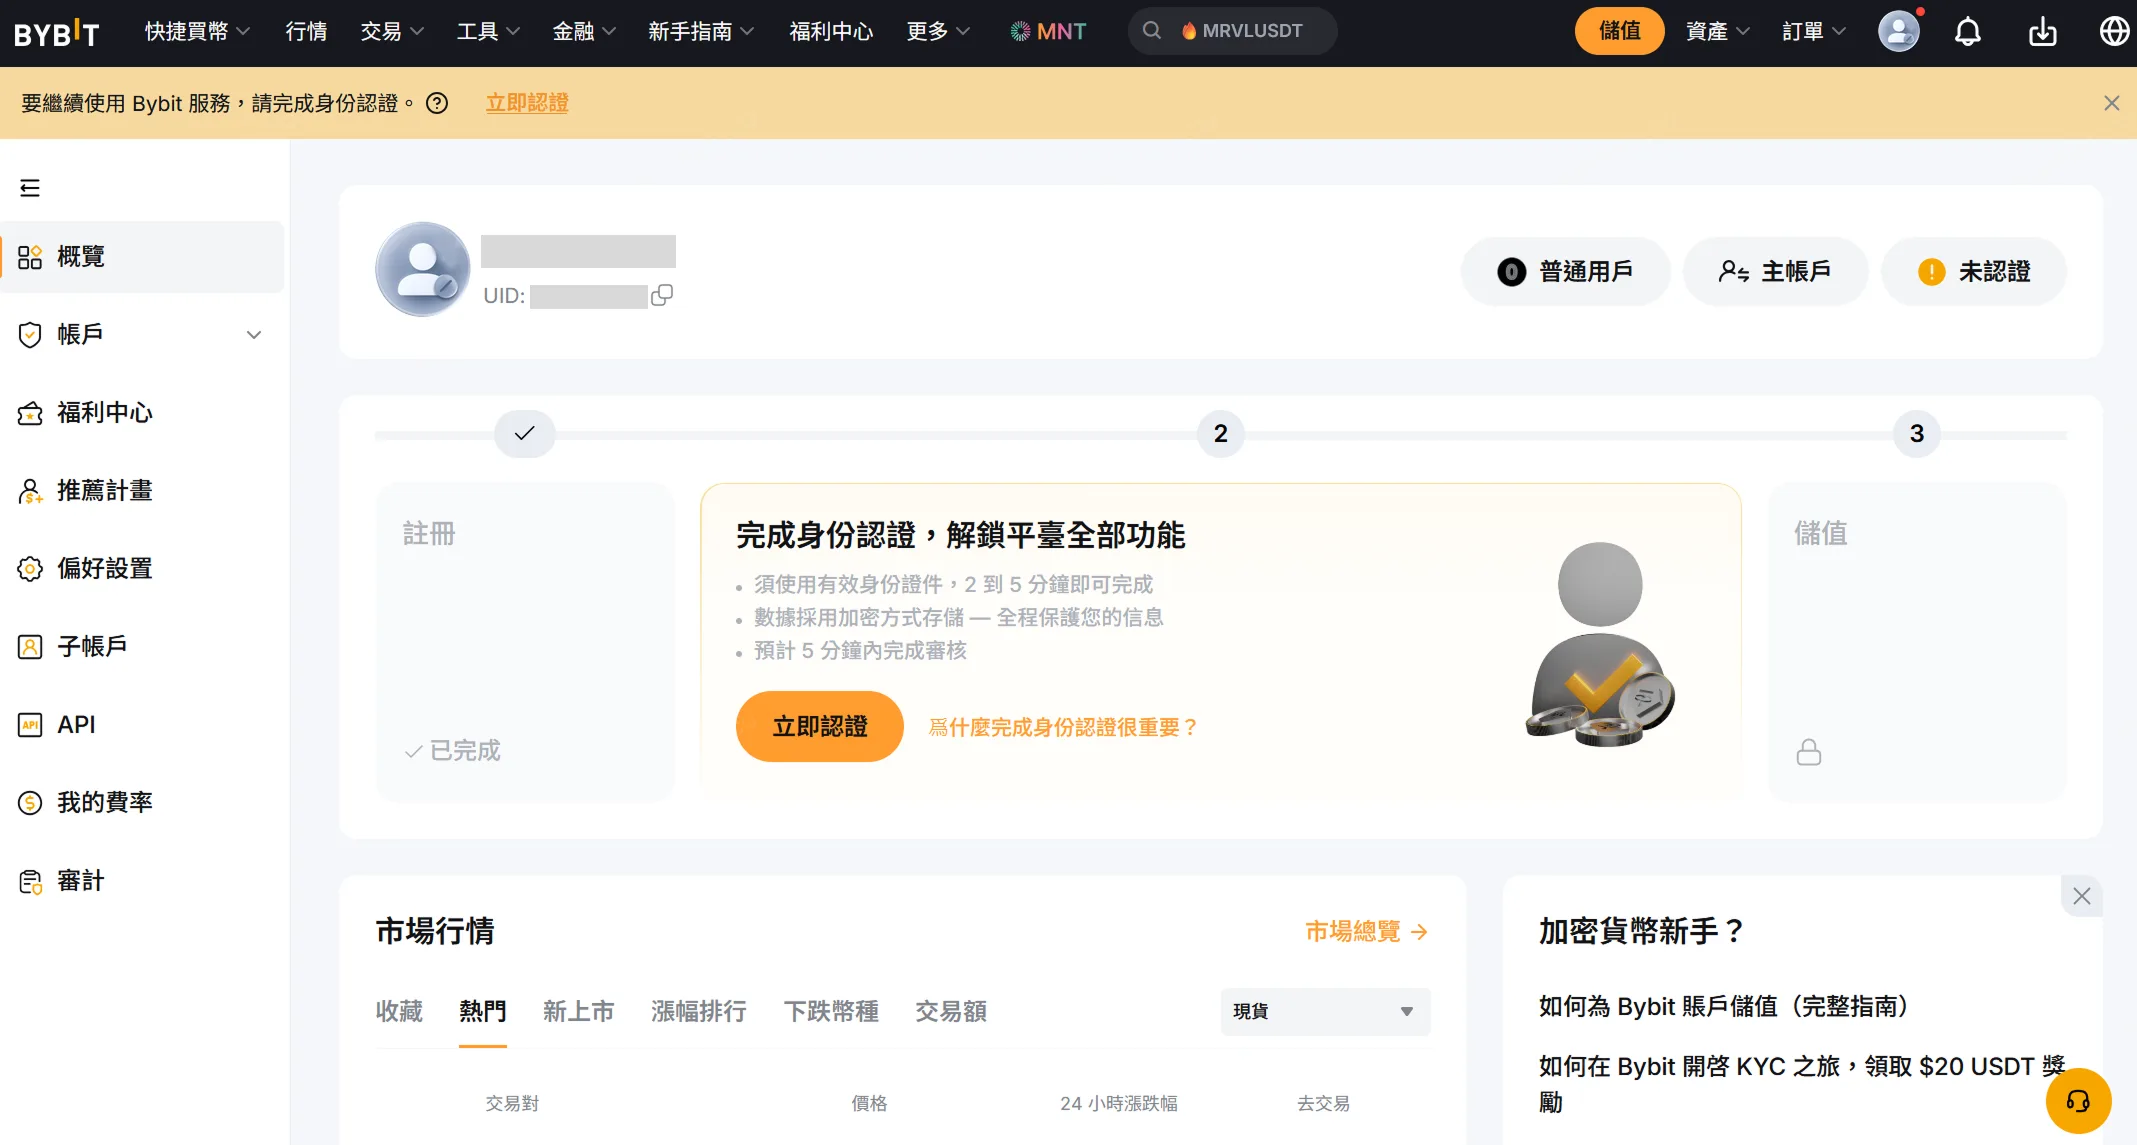
Bybit KYC identity verification guide
Bybit KYC has two levels:
| Level | Required information | Unlocked features |
|---|---|---|
| Lv.1 basic verification | ID document + facial recognition | Fiat deposits, P2P trading, higher withdrawal limits |
| Lv.2 advanced verification | Proof of address | Higher withdrawal limits and fiat services |
Most users only need Lv.1 for everyday use.
KYC Lv.1 steps
Step 1: Open the identity verification page
After logging in, click the avatar in the top-right corner -> “Account & Security” -> “Identity Verification” to enter the Lv.1 basic verification flow.
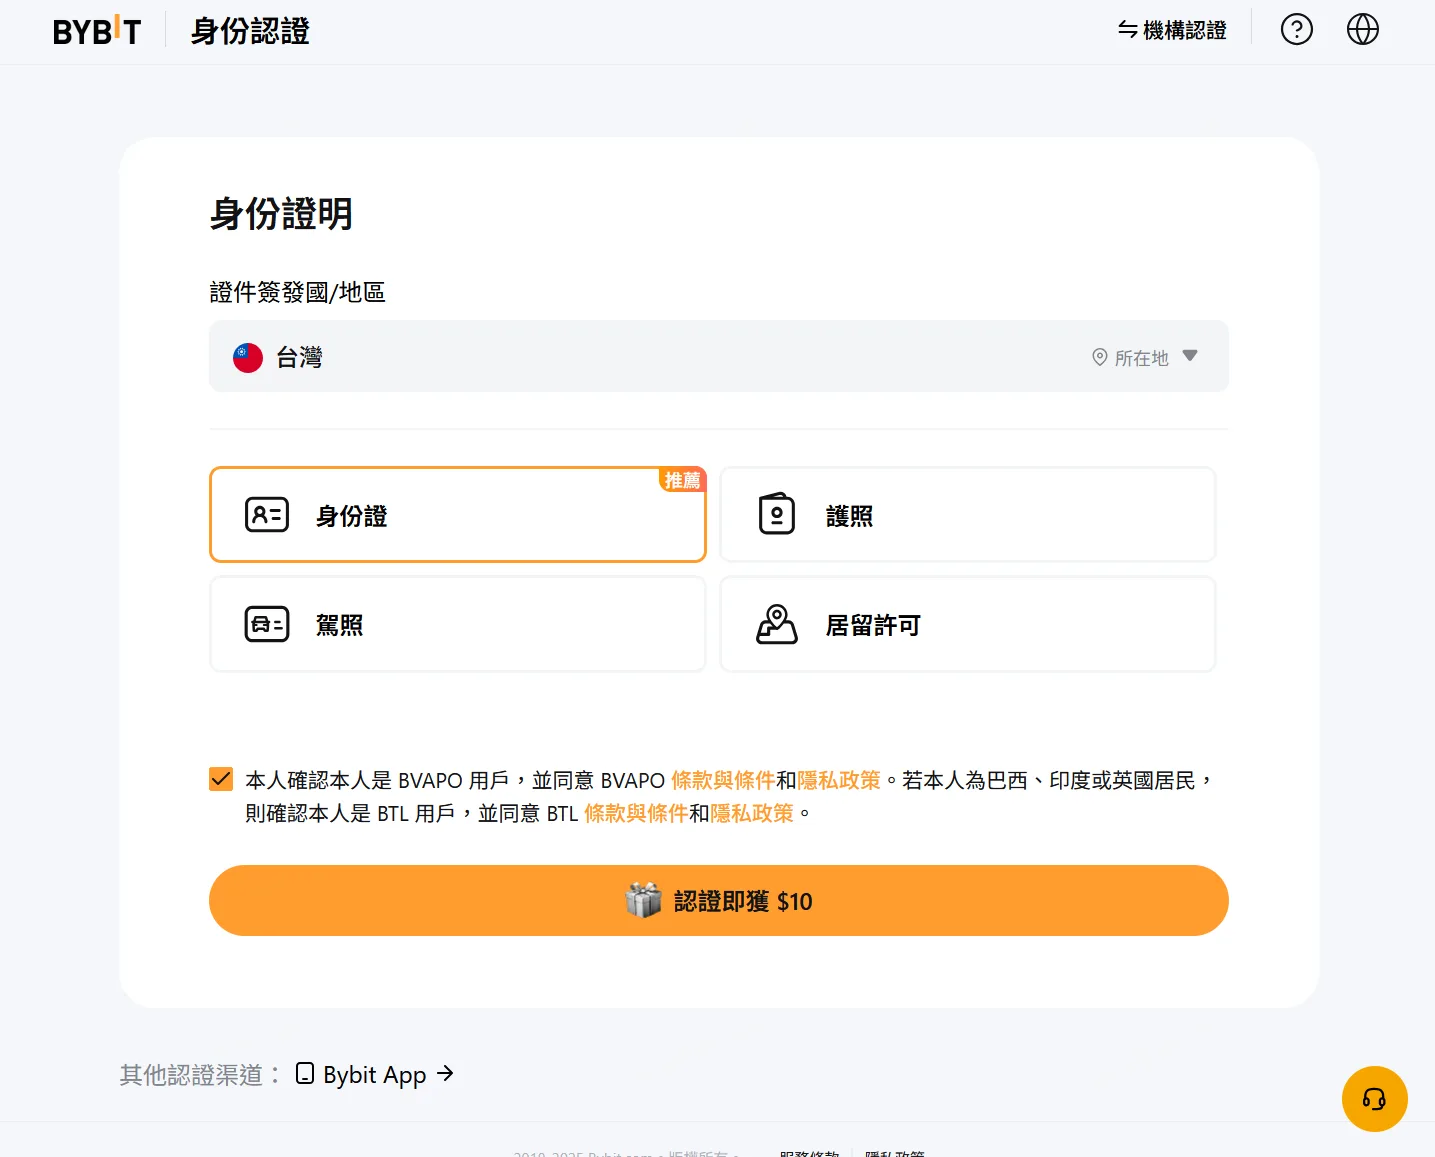
Step 2: Choose country and document type
Choose “Taiwan” as the country. Document type options include:
- Passport (recommended, highest recognition success rate)
- National ID card
- Driver’s license
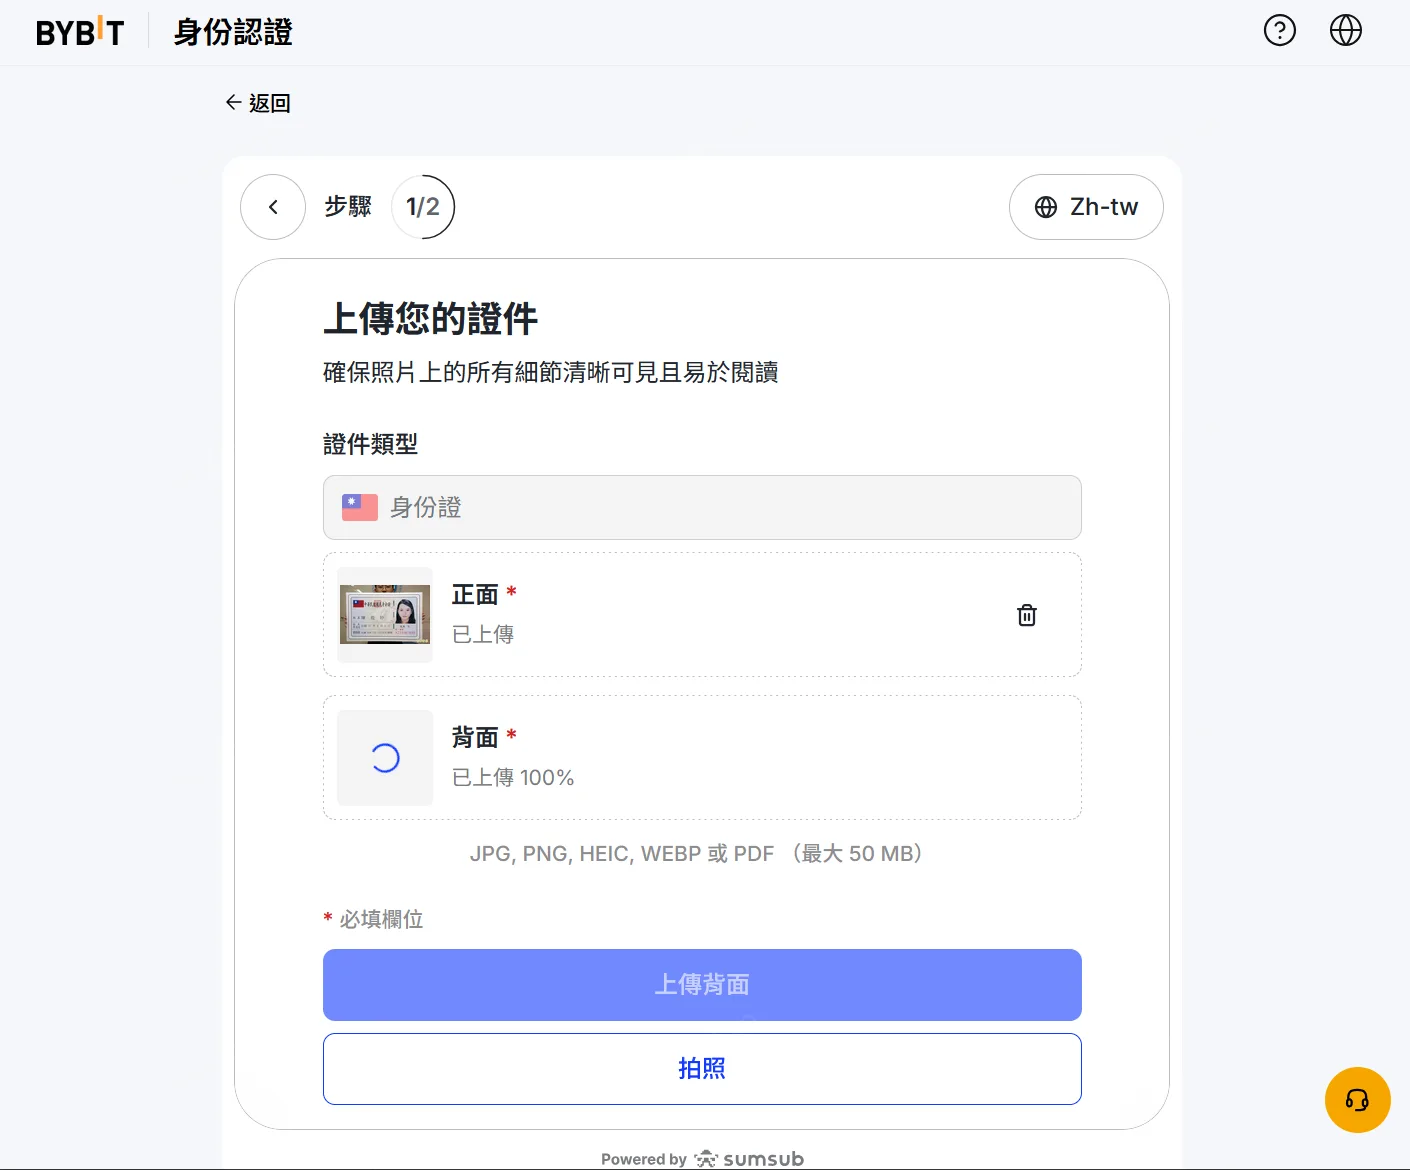
Step 3: Upload document photos
- Take photos of the front and back of the document
- Make sure all four corners are visible
- Use enough light and keep text clear
- Do not use a photo taken from a screen
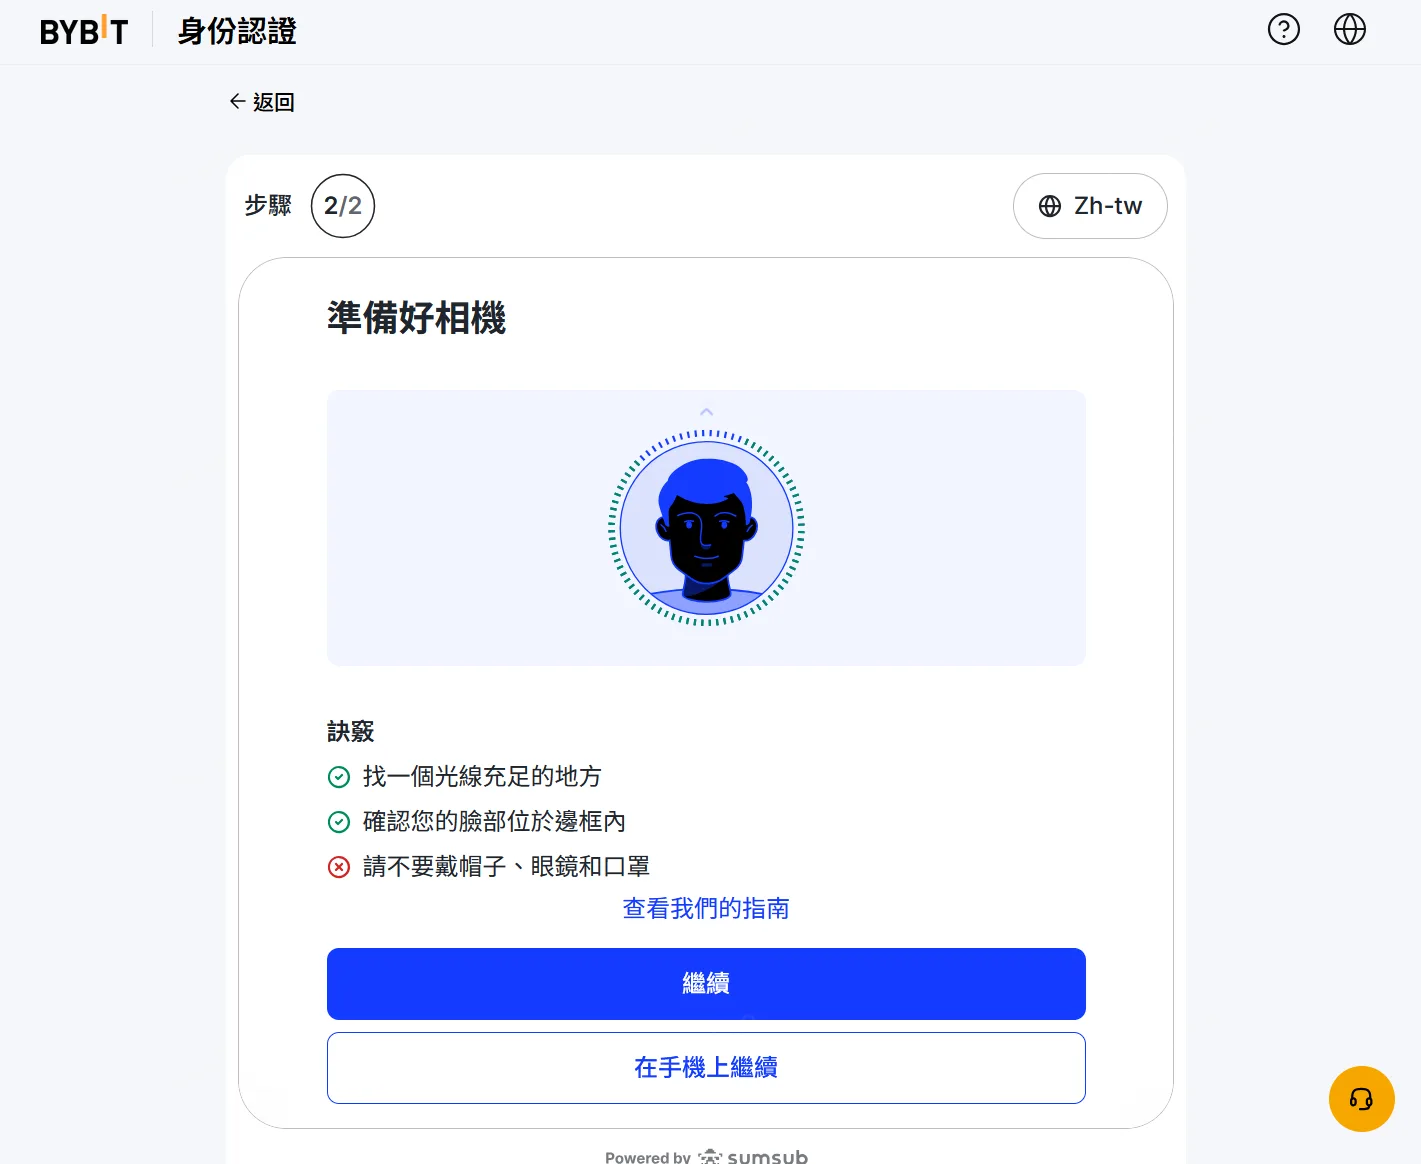
Step 4: Facial recognition
Follow the on-screen instructions to complete facial recognition. Make sure the lighting is bright, the background is clean, and do not wear a hat or sunglasses.
Step 5: Wait for review
After submitting, review usually completes within 5 to 30 minutes. You will receive an email notification after approval.
What if KYC fails? The most common reasons are unclear photos or inconsistent information. Retake clear document photos and submit again. If it fails several times, contact Bybit online customer support, which supports Chinese and usually resolves the issue quickly.
Bybit security settings: 2FA + anti-phishing code
After the account is created, complete the following security settings. They are not optional; they are required basics.
Enable Google Authenticator (2FA)
Two-factor authentication (2FA) is the most important line of defense for your account. Even if your password leaks, an attacker cannot log in without the 2FA code.
Step 1: Download Google Authenticator
Search for “Google Authenticator” in the App Store or Google Play and install it.
Step 2: Open security settings
Log in to Bybit -> avatar -> “Account & Security” -> “Google Authenticator” -> “Bind”.
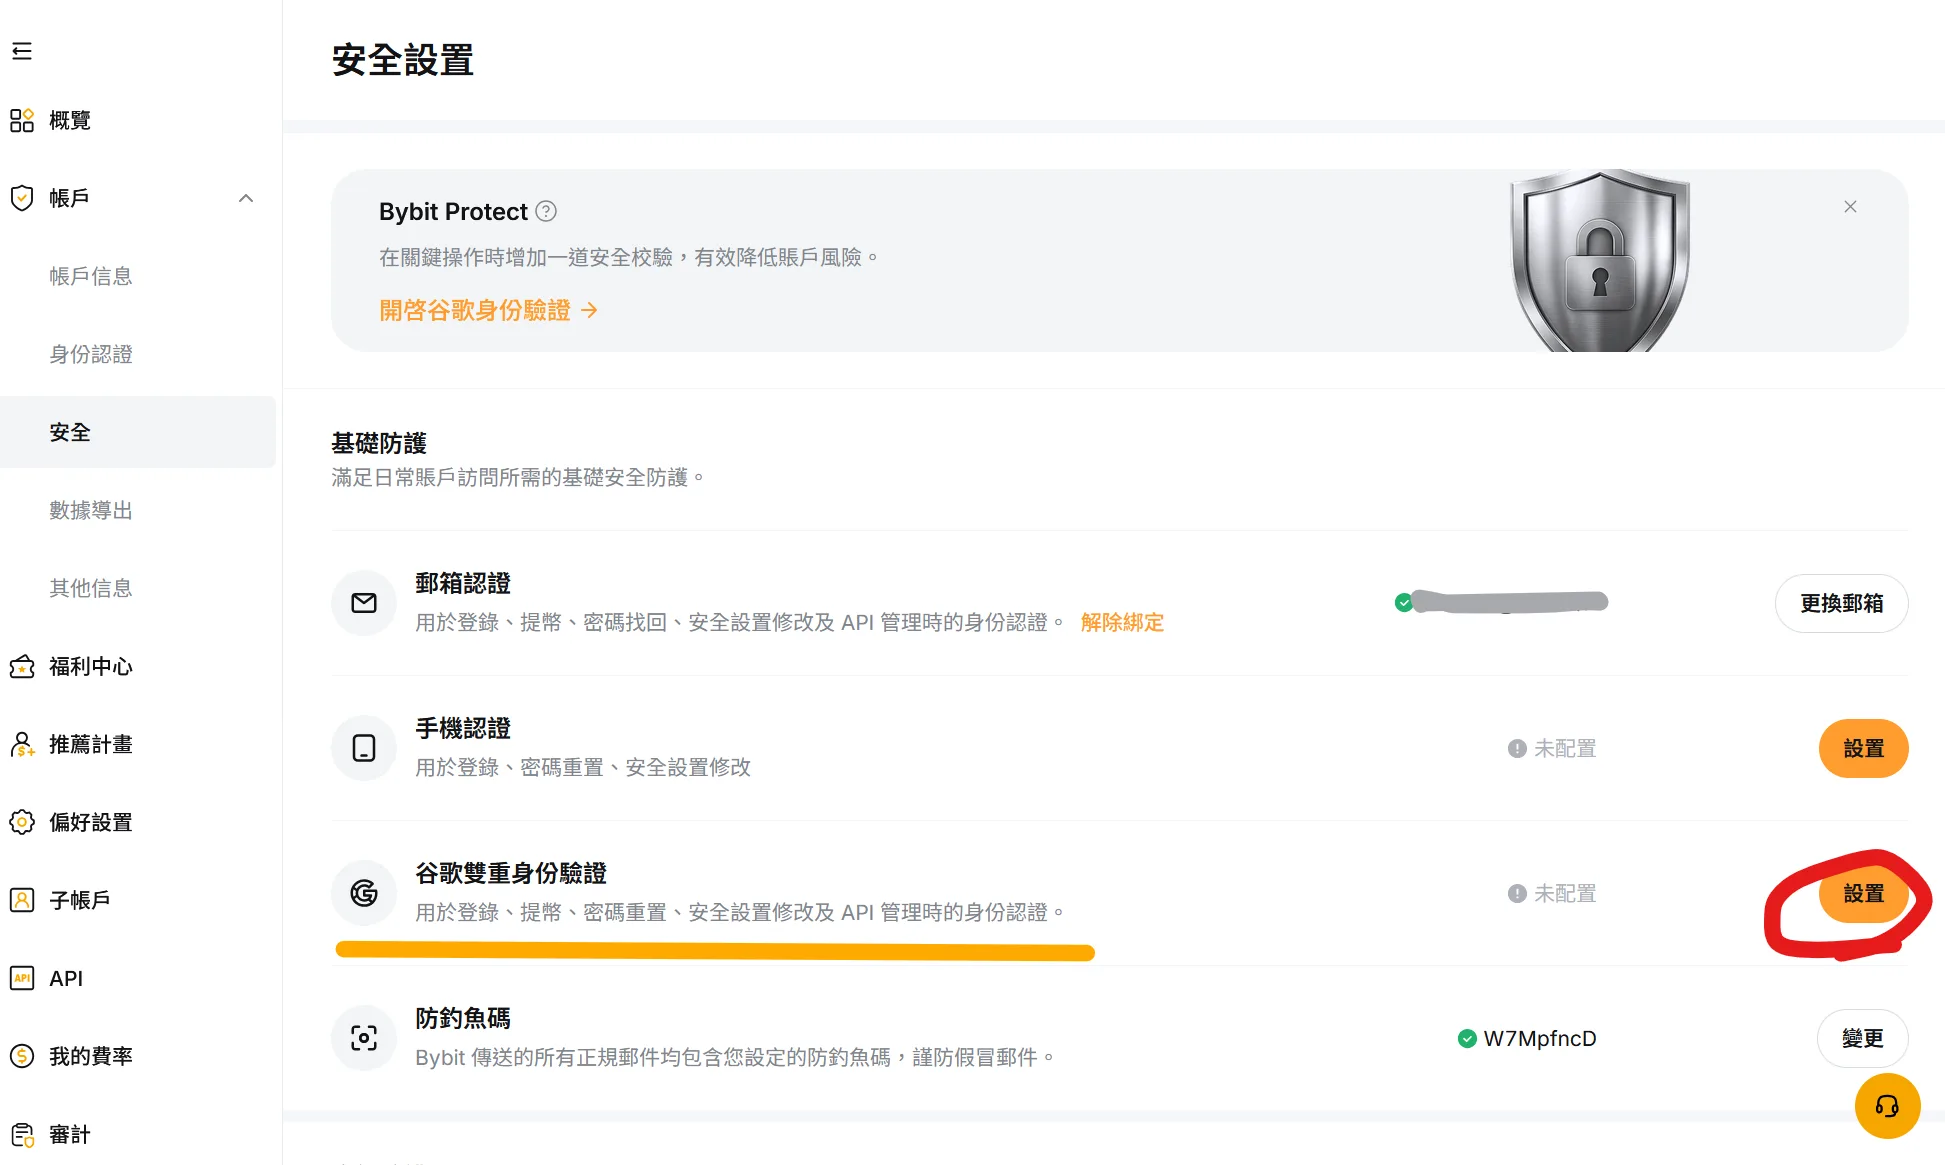
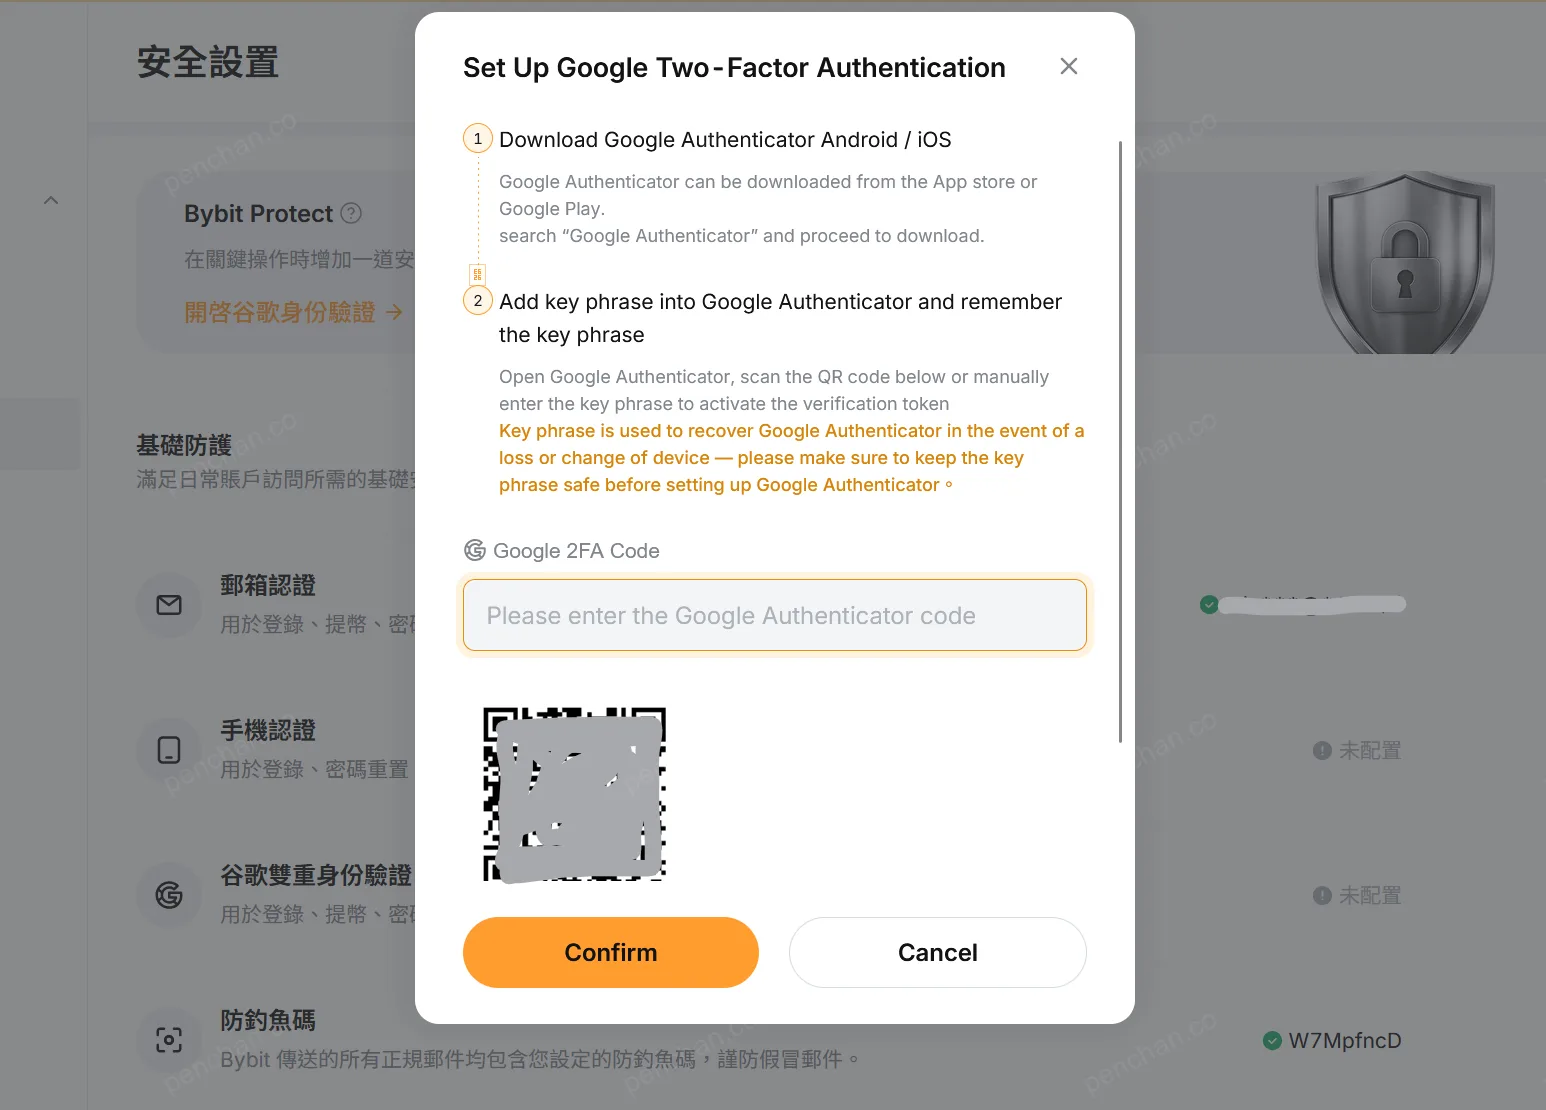
Step 3: Scan the QR Code and back up the key
Open the Google Authenticator app and scan the QR Code provided by Bybit. The system will show a key string. Write this key down and store it somewhere safe (paper or a password manager). If your phone is lost or reset, this key is the only way to recover 2FA.
Step 4: Enter the verification code to finish binding
Find Bybit’s 6-digit code in Google Authenticator and enter it on the Bybit page to complete binding.
Set an anti-phishing code
An anti-phishing code is a custom text string that appears in every official email sent by Bybit. If you receive an email claiming to be from Bybit but it does not contain this text, it is a phishing email.
Path: avatar -> “Account & Security” -> “Anti-Phishing Code”
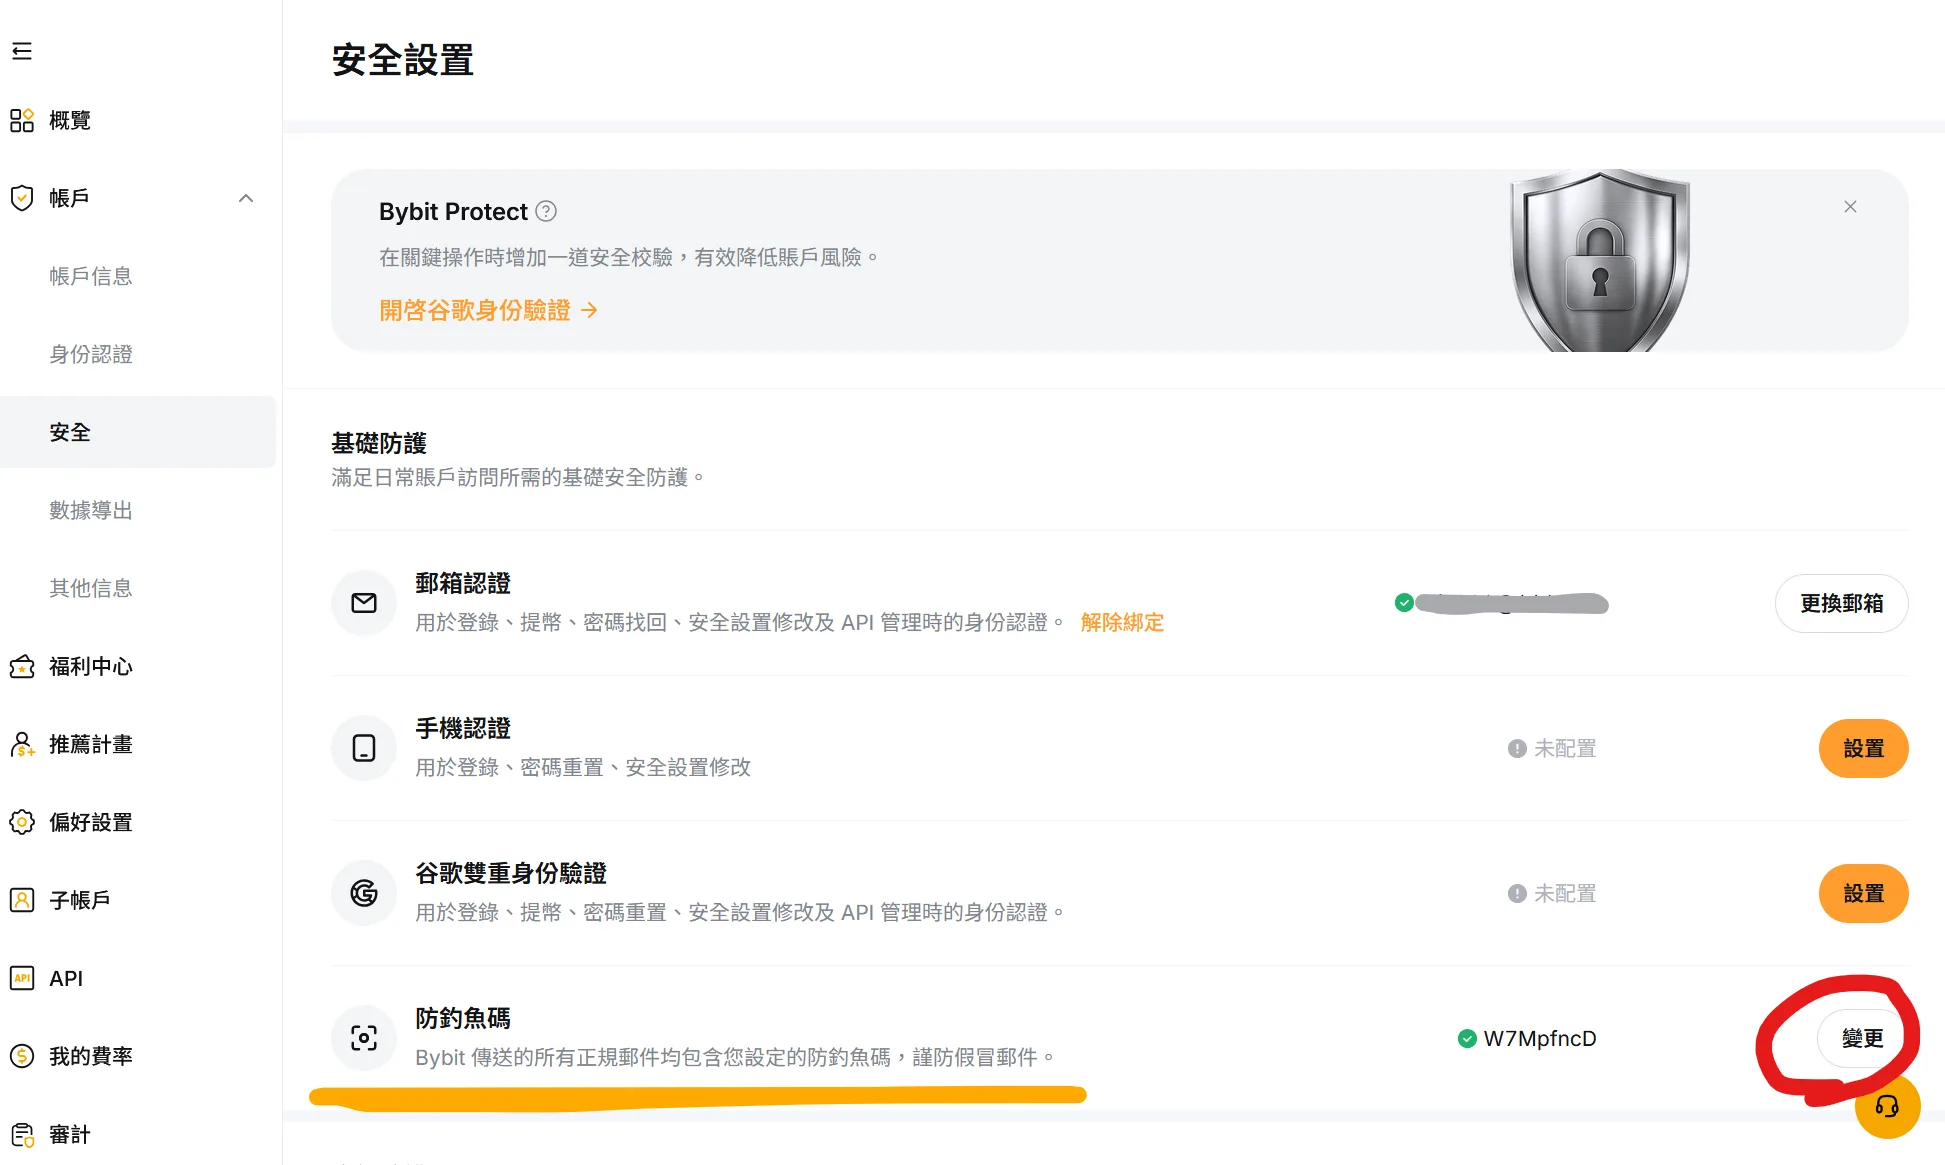
Use a short phrase only you know, such as a nickname plus numbers.
Other recommended security settings
- Bind a mobile number: adds another verification channel
- Set a withdrawal whitelist: only allow withdrawals to addresses you pre-approve, reducing the chance of asset loss after account compromise
- Login device management: regularly check your device list and remove devices you do not recognize
Bybit deposit guide: crypto transfer and P2P
After security setup is complete, you can deposit funds and start using the account. Bybit mainly has two deposit methods:
Method 1: Crypto transfer (recommended)
If you already have crypto on another exchange, such as MAX, the simplest method is to transfer it directly to Bybit.
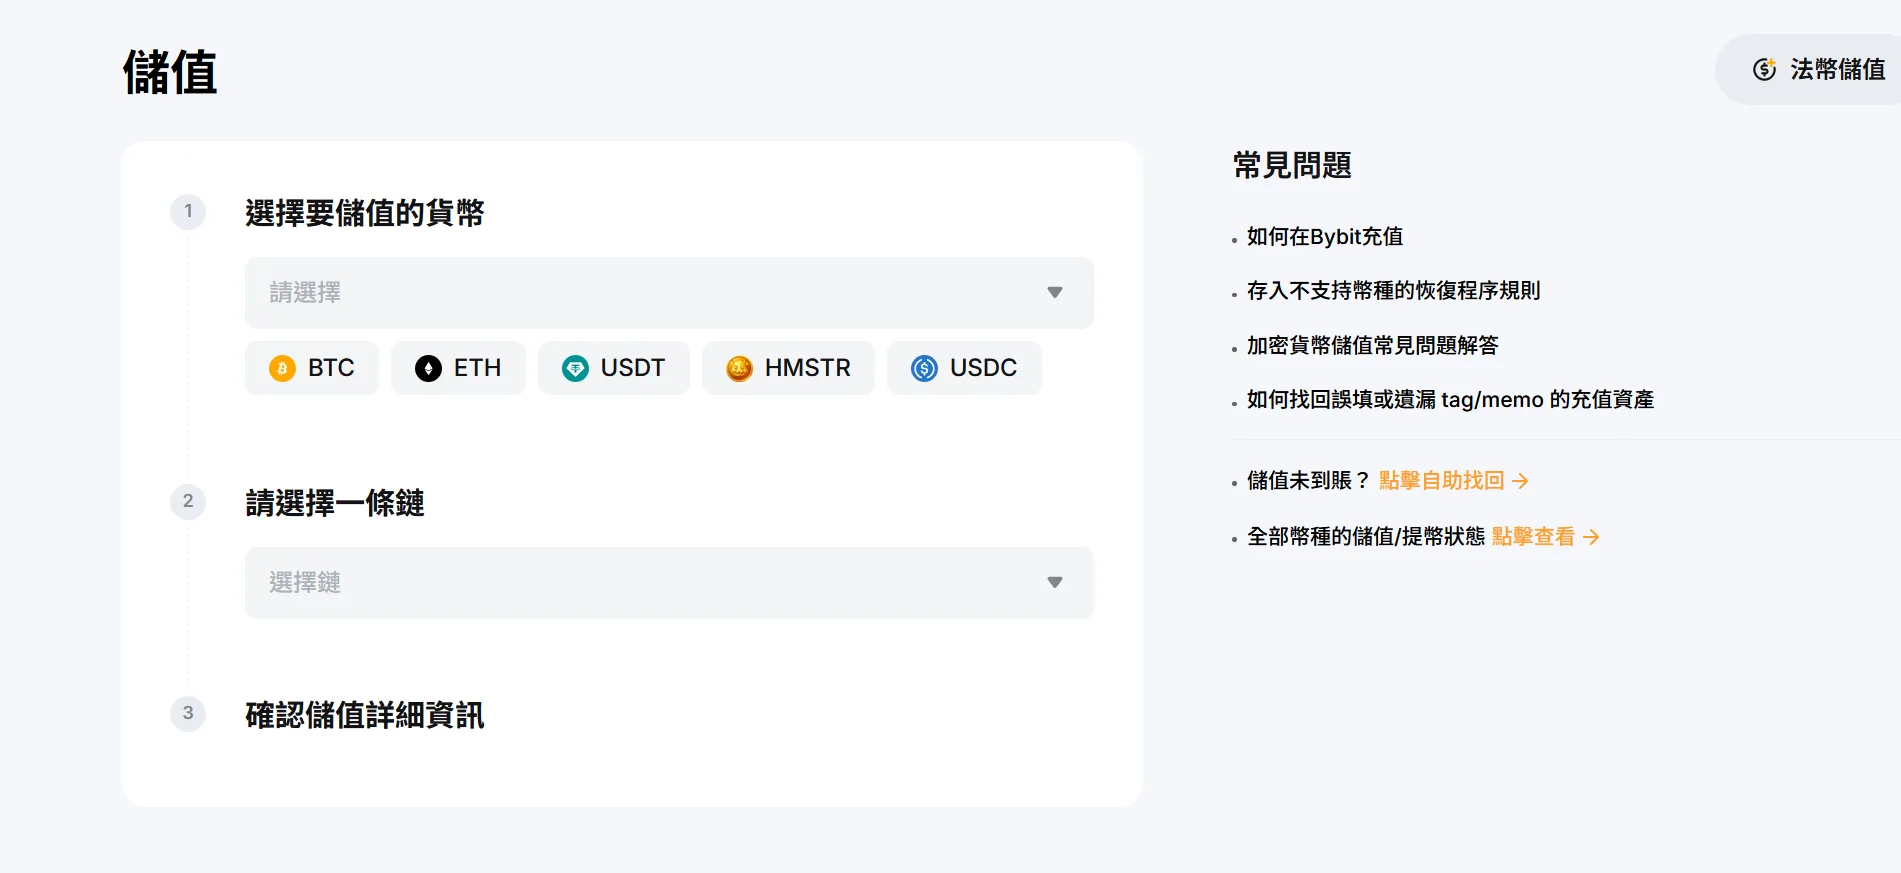
Step 1: Find the deposit address
Log in to Bybit -> “Assets” -> “Deposit” -> search for the coin you want to deposit, such as USDT.
Step 2: Choose the deposit network
Choose the deposit network (chain). This step is very important. Choosing the wrong chain can permanently lose your assets.
Common networks and suggestions:
| Network | Fee | Speed | Suggested use |
|---|---|---|---|
| TRC20 (Tron) | Lowest (about 1 USDT) | Fast | First choice for small or everyday transfers |
| ERC20 (Ethereum) | Highest (depends on gas) | Slower | Large transfers or when you need the ETH ecosystem |
| Arbitrum / Optimism | Low | Fast | L2 users |
| BSC (BNB Chain) | Low | Fast | Transfers from Binance |
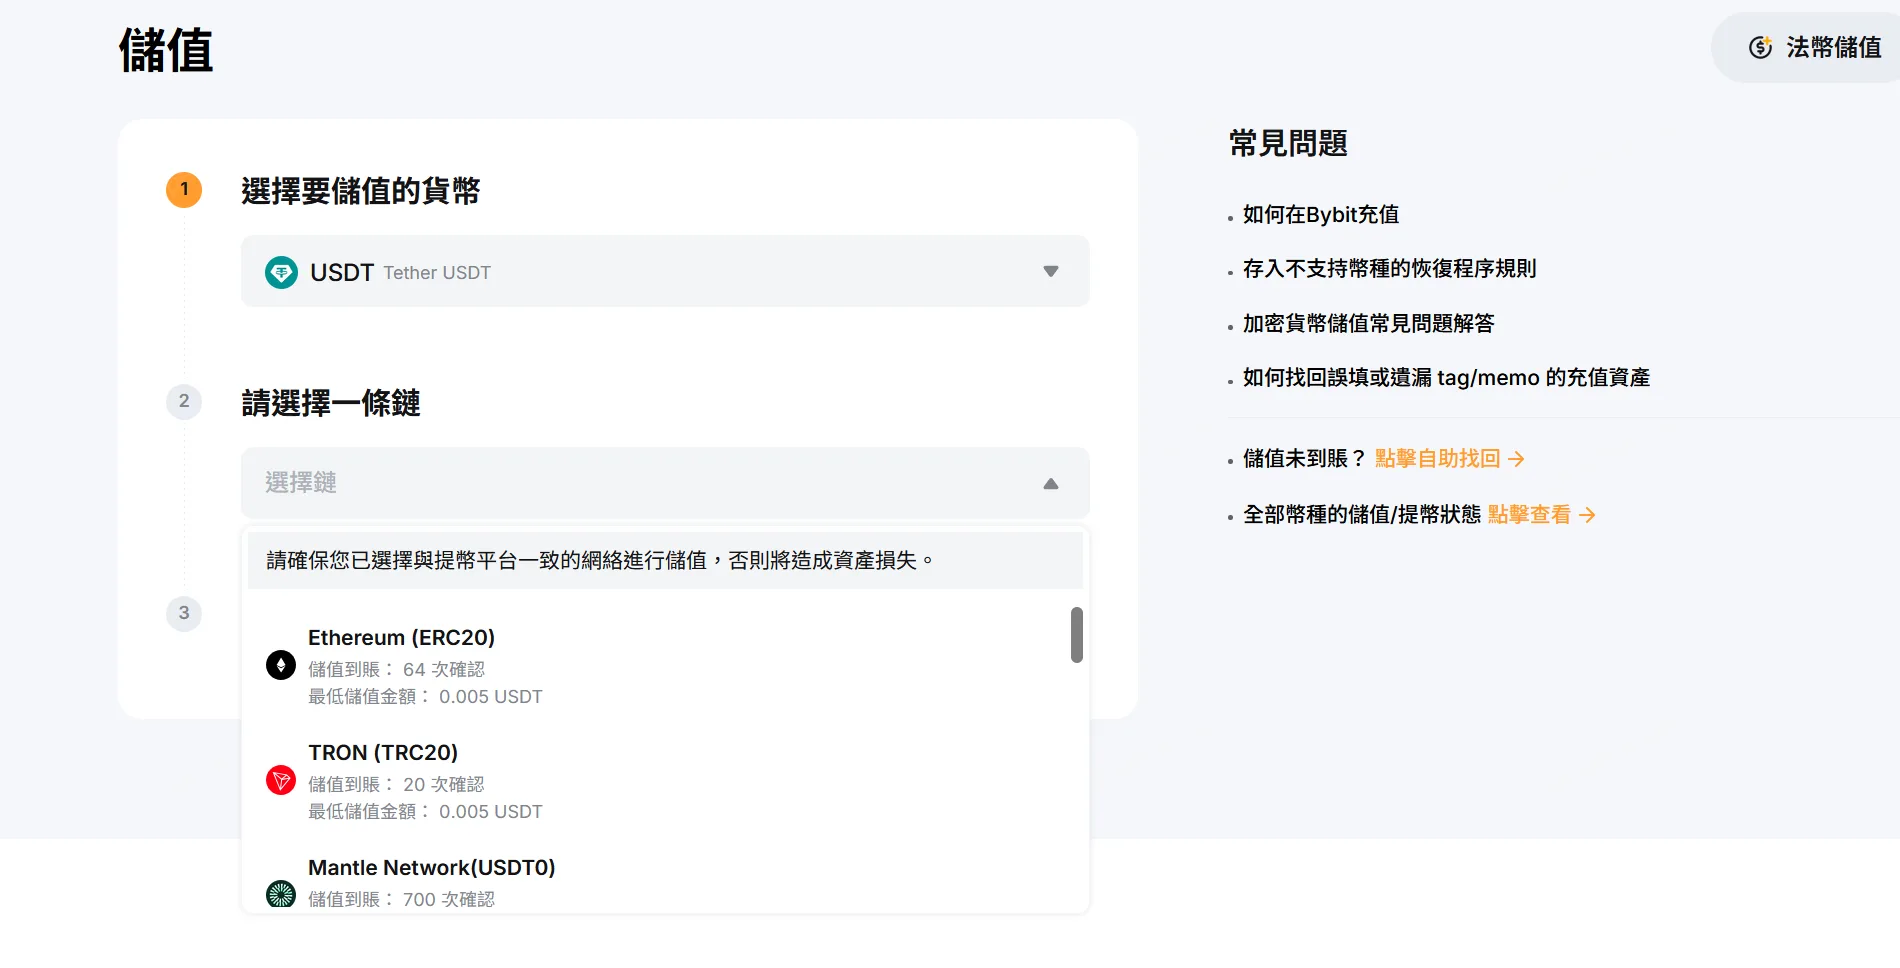
Step 3: Copy the deposit address
After confirming the network is correct, Bybit will show the deposit address. Copy it, return to your sending platform (for example MAX), paste the address, and complete the withdrawal.
Check the address: before transferring, always compare the first few and last few characters of the address. For your first transfer, send a small test amount first.
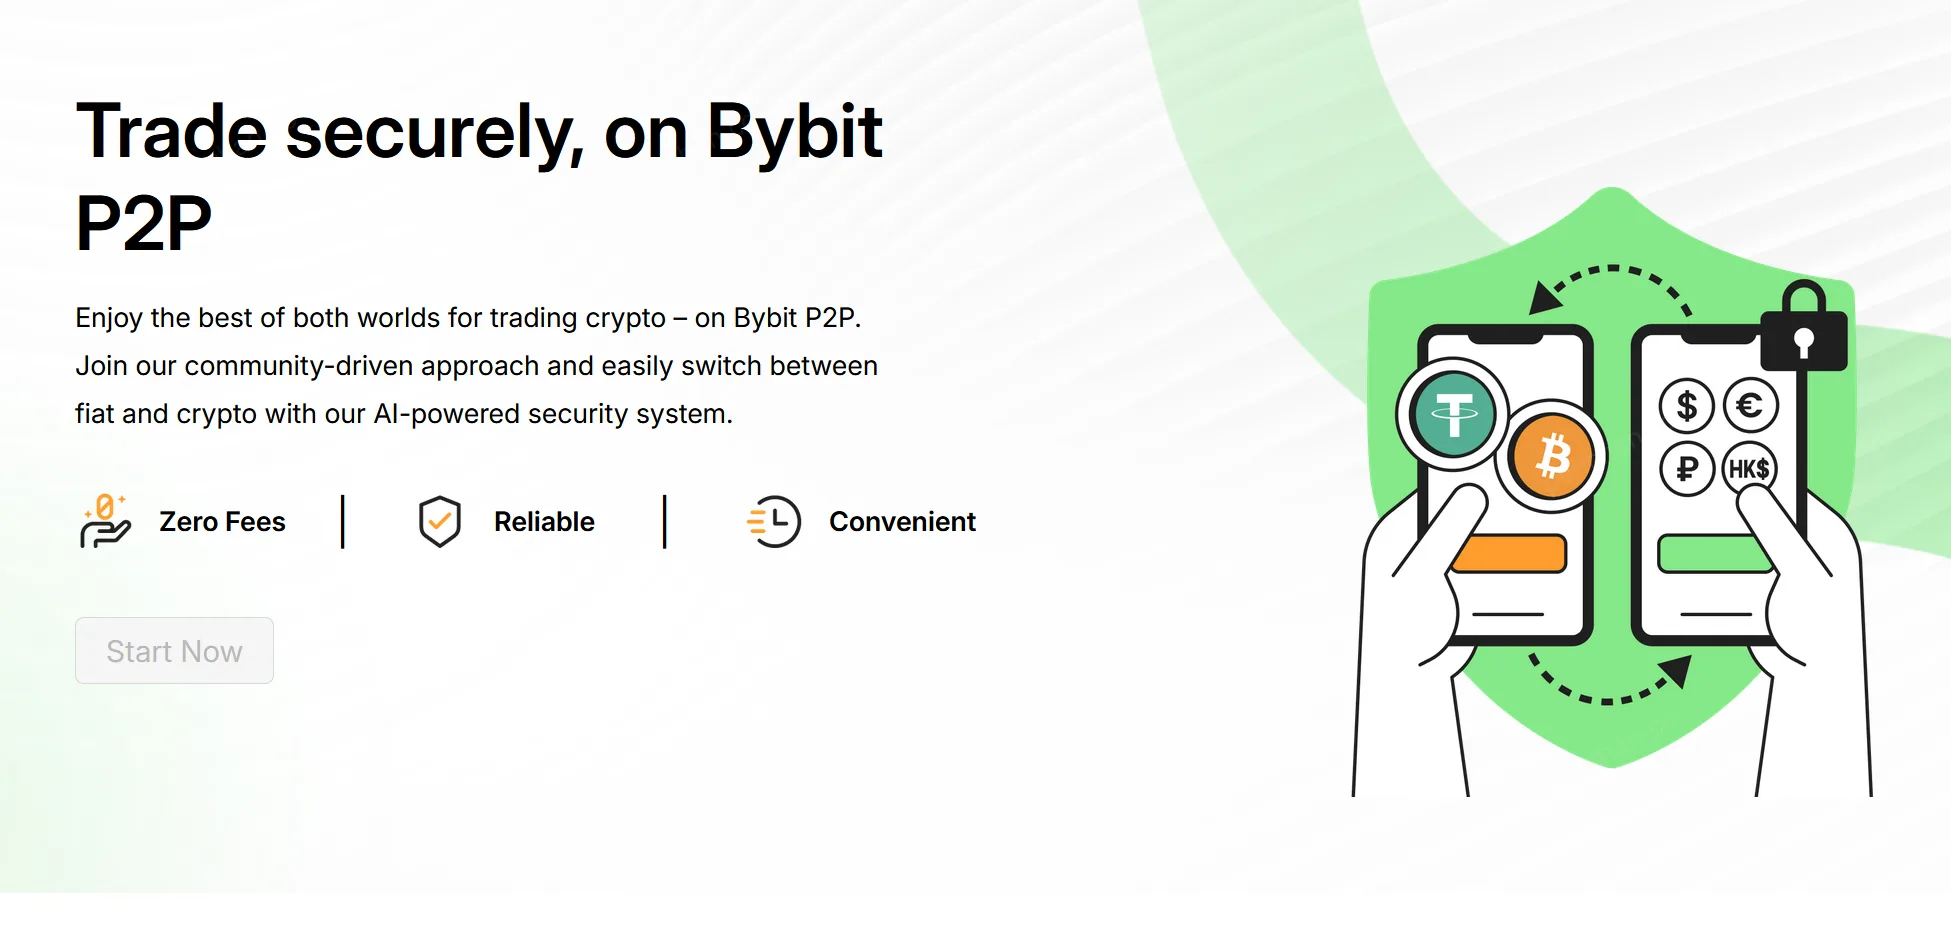
Method 2: P2P trading (fiat deposit)
Bybit’s P2P market lets you buy and sell crypto directly with fiat currencies, including New Taiwan dollars.
Step 1: Open the P2P page
Bybit App -> “Buy Crypto” -> “P2P”.
Step 2: Choose coin and payment method
Choose the coin you want to buy, usually USDT, and choose bank transfer as the payment method.
Step 3: Choose a seller and place an order
Browse the seller list and pay attention to completion rate and completed order count. Choose a well-rated seller and enter the amount you want to buy.
Step 4: Pay and confirm
Transfer funds to the bank account provided by the seller, then tap “I have paid” on Bybit. After the seller confirms receipt, USDT is automatically released to your account.
P2P notes:
- Chat only inside the Bybit P2P platform; do not move to Line or Telegram private chats
- After payment, always tap “I have paid,” or the order may time out and be cancelled
- If there is a dispute, use the platform appeal function instead of negotiating privately
- For Taiwan users, MAX exchange is generally a better fit for TWD deposits because the exchange rate is more stable and there is trust protection
Summary: complete Bybit account opening in 30 minutes
The full Bybit account-opening flow:
- Register an account: use the referral link to create an account and receive fee benefits
- Complete KYC: upload document photos and finish facial recognition; approval usually completes within 30 minutes
- Security settings: enable Google 2FA and set an anti-phishing code. This is required
- Deposit funds: transfer crypto from another exchange, or use P2P fiat deposits
If everything goes smoothly, the whole process can be completed within 30 minutes. After that, you can use Bybit for spot trading, futures trading, copy trading, Earn products, and more.
If you are a Taiwan user starting from zero, the recommended route is: buy USDT with TWD on MAX exchange -> transfer to Bybit -> start trading or using Earn. Not sure which exchange to choose? See the full comparison in recommended crypto exchanges.
Recommended related guides:
- MAX exchange TWD deposit guide: the first step for Taiwan users converting TWD to USDT
- Complete Binance account-opening guide: the world’s largest exchange, with more coins
- Complete OKX account-opening guide: stronger Web3 wallet and copy trading features
- BingX copy trading guide: a professional copy trading platform
- Crypto beginner’s guide: a complete beginner path
- Recommended crypto exchanges: exchange comparison and selection guide
This article was written with assistance from Penna (AI). It summarizes public information and may contain errors or outdated details. Please confirm with the latest official announcements before use.